To be honest I was not looking forward to this challenge. Coding is something that is that I honestly thought I would not be able to do. I have a very talented brother who has been a computer programmer for many years. I know that he has experience in platforms such as Java and C+ and his University text books were enough to give me nightmares. So here it goes (with no help from my brother at all)…..
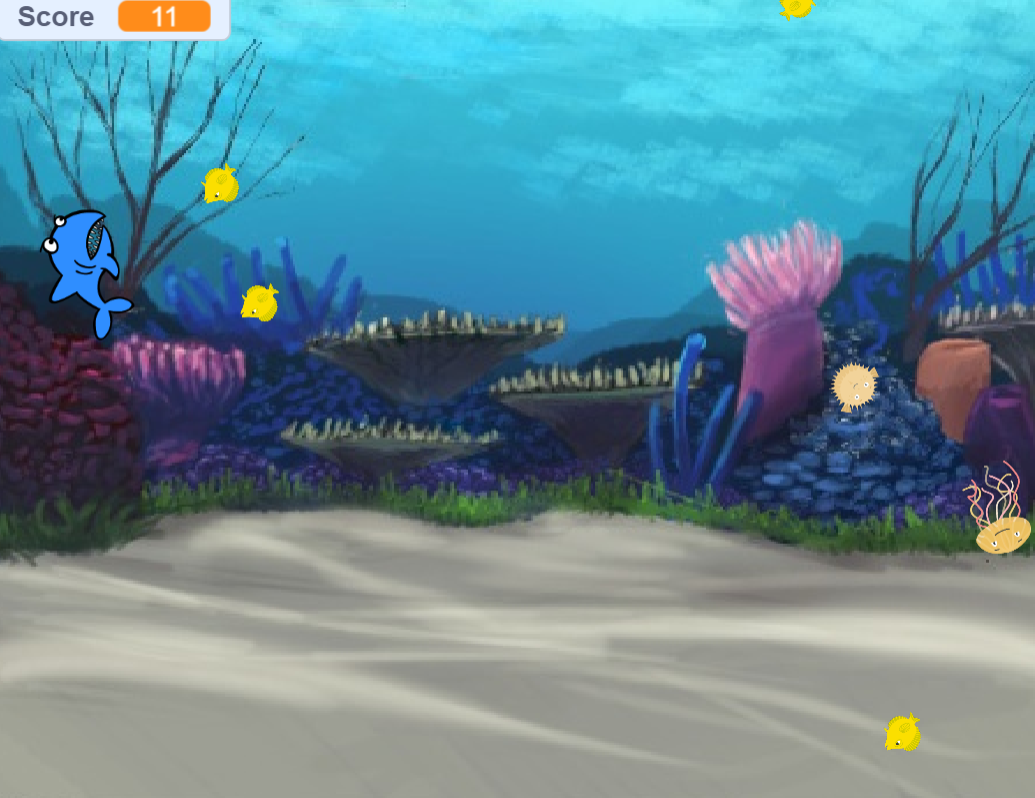
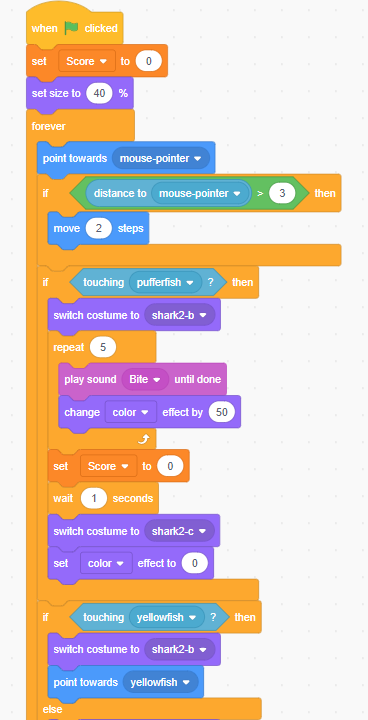
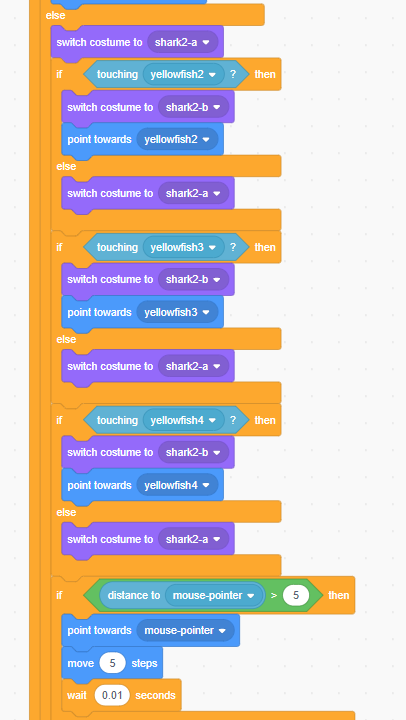
The Shark challenge: Well I started this process before the code instructions were updated. Hmm… I was thinking at times, this is not working. So, I left it and went back to it several times over and over again. Through lots of trial and error, I worked out how to make the variable and name it “score”. I have played around the program and have made some alterations to the original code. The best thing I discovered was that I could not break the computer, that it was okay to make mistakes, as you never know what you can learn by making mistakes. Please find below the link to my shark coding game.
I have also loved playing around with the sprite’s costumes. This helps the designer (in this case me) target a specific audience.
Swimming Shark
Eating Shark
Sick Shark
I have also introduced a jelly fish that floats around (using a code that moves, waits and change direct) and changes colour if touched by the shark. When I first introduced movement to my jelly fish he was flying around the screen and bouncing off the walls like a bouncing ball. Not what I had in mind. However, by adapting the code and trial and error enabled me to slow down the movement to more drifting sequence. Challenge accepted and even though my code is not perfect, I am happy with the results.
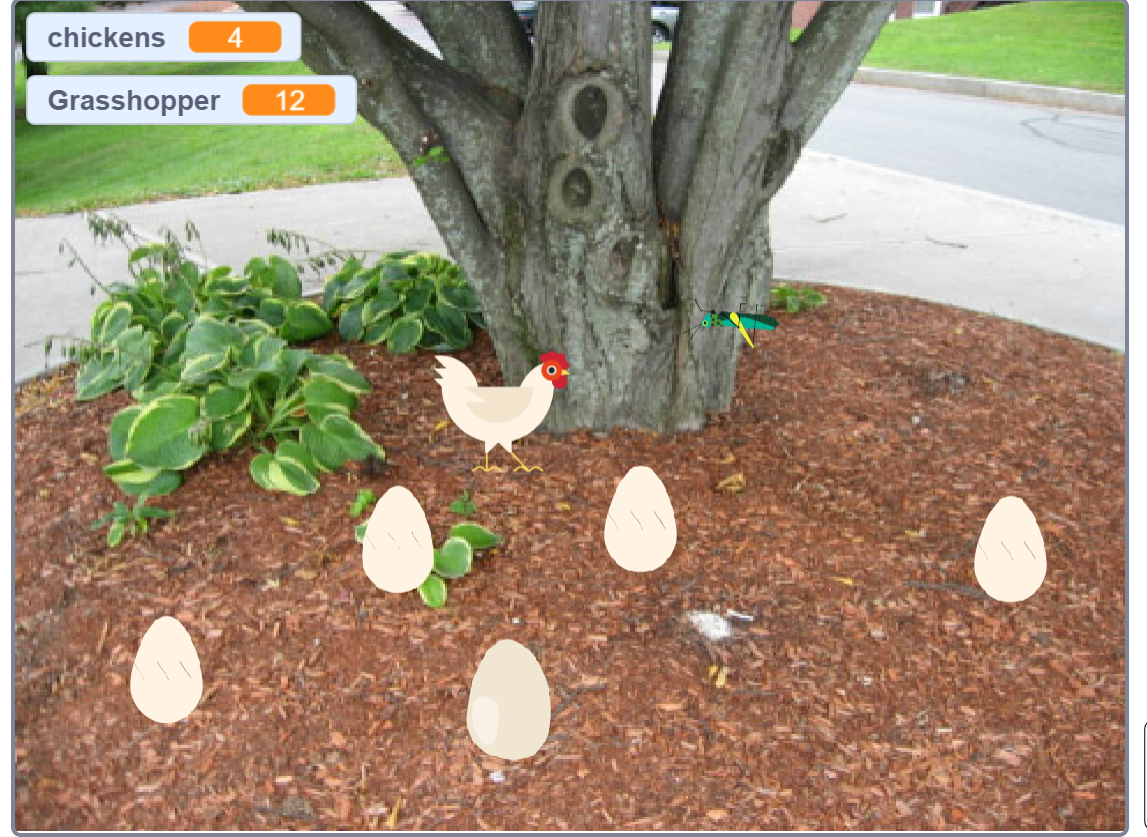
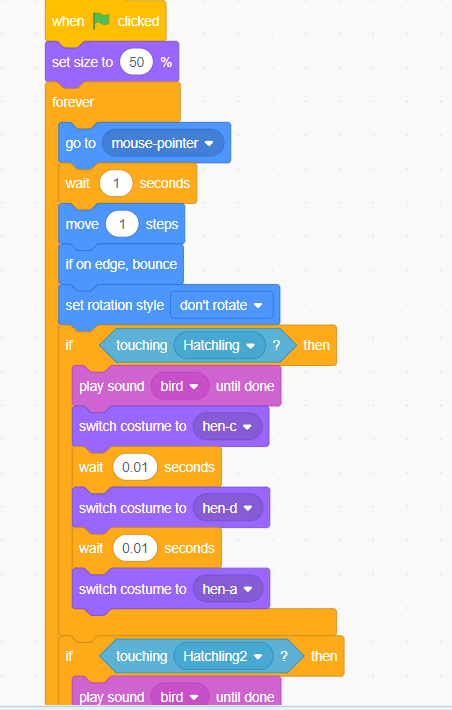
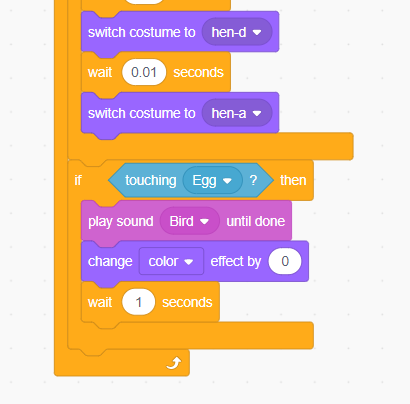
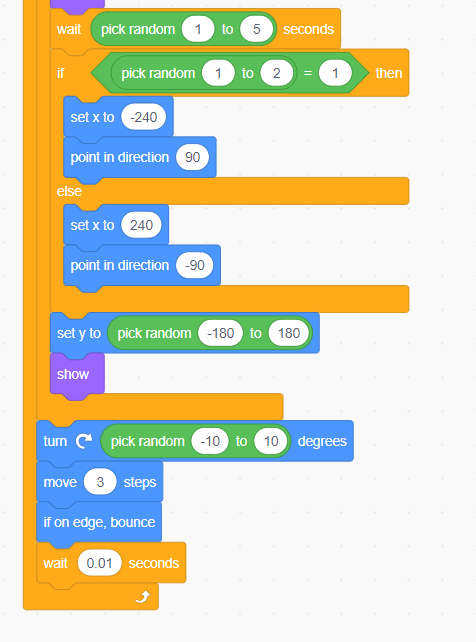
So after completing this challenge, I thought I would try my hand at a different code game. I started with a chicken and hatching eggs. I then added in a bad egg (that resets the score, little legs appear and a hmm speech bubble). I then add another variable a grasshopper. Please find below my link.
I still would say that my code is not perfect, and there are areas that I could still improve on. However, at the start of this challenge I seriously questioned my ability to code. So if I can do it… anyone can.
I have had lots of fun experimenting with coding and have learnt a lot through trial and error. This highlights this exercise requires time, for students to explore and experiment, as well as for trial and error. I know that I was not able to get the coding right the first time, and I am now still going back to improve or add more to both coding game. I can see that students would be extremely engaged in the coding process and is fantastic for process to highlight computational thinking.
Cyber Safety
As with all activities in the classroom, safety is of paramount importance to our students, as teachers we have a duty of care (Australian Curriculum and Reporting Authority (ACARA), 2018). The use of computers in the classroom also highlight the need to teach students cyber-safety. It is of the utmost importance that they do not share their personal information online as it can be used for undesirable purposes. Students must fully understand the importance of strong passwords and keep it private, as it is a way to protect their identity. Also, how to behave whiles online by being kind and respectful. It is highly important that students are aware of how to use digital devices in a safe manner for their own protection. Below is great poster to remind students of these points and more about cyber safety by the Australian Government eSafety Commissioner. Other rich resources are available through their website on games and other resources to help teach cyber safety.
Cyber Rules Poster
Teachers are also required through the Australian Professional Standards for Teachers as stated in Standard 4 to “Create and maintain supportive and safe learning environments”. Stardard 4.5 highlights the use of ICT safely, responsibly and ethically (AITSL, 2011).
Links to the Curriculum: Foundation to Year 2- Digital Technologies
Recognise and explore digital systems (hardware and software components) for a purpose (ACTDIK001). Students to learn that there are a wide variety of digital systems. For example a smartphone is a digital system that has software (apps), input components ( touch screen, keyboard, camera and microphone), output components (screen and speakers), memory components (silicon chips), communication components (SIM card, wi-fi, bluetooth).
Follow, describe and represent a sequence of steps and decisions (algorithms) needed to solve simple problems (ACTDIP004).
An algorithm is a computer procedure that is a lot like a recipe (called a procedure) and tells your computer precisely what steps to take to solve a problem or reach a goal. Coding is a list of instructions given to a computer to do something. Scratch is a platform where students can learn to code to make simple computer games (Australian Government, 2017). Through coding students learn that there’s often more than one way to solve a problem. “Learning to code encourages children to become creators, not just consumers, of the technology they use” (Australian Government, 2017).
Explore how people safely use common information systems to meet information, communication and recreation needs (ACTDIP005). Cyber safety is an important aspect for all those who use digital technologies (refer above).
Create and organise ideas and information using information systems independently and with others, and share these with known people in safe online environments (ACTDIP006) It is important for students to be able to share ideas and information with others is a safe way (refer to cyber safety above).
Reflection on Completing All of the Technology Challenge
Wow, these challenges have tested me, firstly personally and then professionally as a teacher (how to make these exercises suitable for the classroom). Aspects of personal safety, design thinking, cyber safety are all important aspects to consider. I did find the challenges a great way to learn and grow my skills. The sense of achievement has been very rewarding. This is also a very important aspects for my students to feel and achieve. I have also learnt a lot of very valuable new skills. Thank you for this rewarding journey.
References:
Australian Curriculum Assessment and Reporting Authority (ACARA). (2018). Technologies: Digital Technologies: Foundation to Year 2. Retrieved 11th May 2019 from https://bit.ly/2z9PE7K
Australian Institute for Teaching & School Leadership (AITSL), (2017). Australian professional standards for teachers. Retrieved 11th May 2019, from https://www.aitsl.edu.au/teach/standards
This is an exciting challenge. I have always tried to recycle and re-purpose unwanted items, which has been greatly influenced by my father, who takes this theory to a whole new level. I have tried to make my garden practical and low maintenance, as I have little time to spend to upkeep the garden. Over the last year, I have tidied up my backyard to allow more sunlight onto the property, allowing more area for my 6-year-old daughter to run around and play, keeping the garden easy to maintain.
I wanted to add more greenery and interest to the patio area to bring the garden into our outside entertainment area. However, this also had to be easy to maintain. So I decided to add a hanging pot plant. I needed to consider low maintenance plants that did not require regular watering (due to our recent dry conditions). Logically, a hanging plant would be a great idea for under the patio. However, I also wanted to recycle or use items no longer being used. I started having a look at different approaches.
Australian Curriculum Links: Design and Technologies – Foundation to Year 2
Design and Technologies knowledge and Understanding:
Identify how people design and produce familiar products, services and environments and consider sustainability to meet personal and local community needs (ACTDEK001)
Making design decisions based on personal and family needs, for example, downloading and comparing recipes to suit available cooking facilities such as cooking in the bush compared to cooking in a kitchen.
Exploring designed solutions to meet individual, family and community needs with a focus on materials, for example, fabrics used for sports clothing, soft fall for play spaces.
Exploring materials, components, tools and equipment through play to discover potential uses when making products or modelling services and environments, for example, when designing and making clothes, toys and shelters.
Design and Technologies Process and Production Skills:
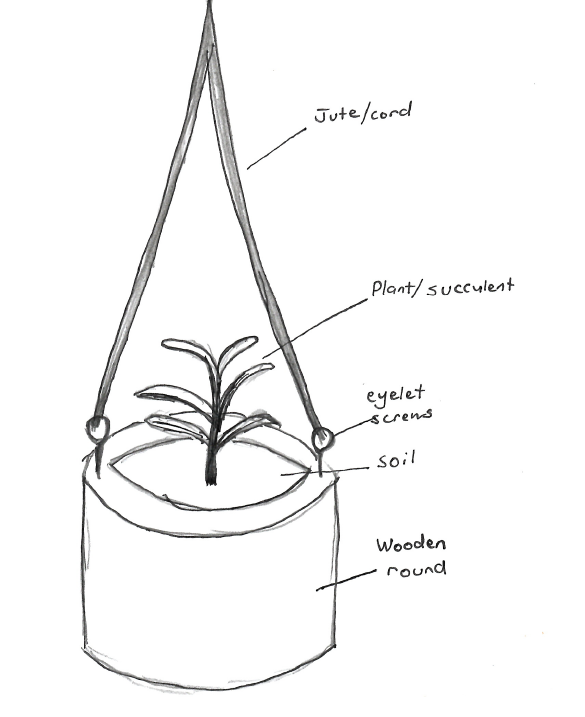
Using and playing with everyday materials in new ways or re-using discarded materials, for example, using discarded materials to design, make and model a constructed environment. In this design project: string, large cut branch off tree, plant cuttings, eyelet screws.
Assembling components of systems and checking they function as planned, for example, when making a musical instrument. Do the screws and string hang the plant evenly? Can the string support the weight of the potted plant?
Use personal preferences to evaluate the success of design ideas, processes and solutions including their care for the environment(ACTDEP008)
Developing criteria for success with teacher guidance, including consideration of the impact on the environment.
Recording a judgement about design ideas with teacher guidance, for example expressing own likes and dislikes about a design idea.
Reflecting on the processes and challenges of designing and producing a solution and sharing these reflections using digital technologies, for example when growing a food product, designing a structure to take a load or making a nutritious snack.
Suggesting areas for design improvement.
Sequence steps for making designed solutions and working collaboratively (ACTDEP009)
recording the procedure for making a product, for example a recipe or instructions for making a container.
identifying roles for each member of a group when working collaboratively.
This Design has cross-curriculum connections with science: Science Understanding
Biological Science: the use of plants in our design
Foundation: Living things have basic needs, including food and water (ACSSU002)
Year 1: Living things have a variety of external features (ACSSU017) Living things live in different places where their needs are met (ACSSU211)
Year 2: Living things grow, change and have offspring similar to themselves (ACSSU030)
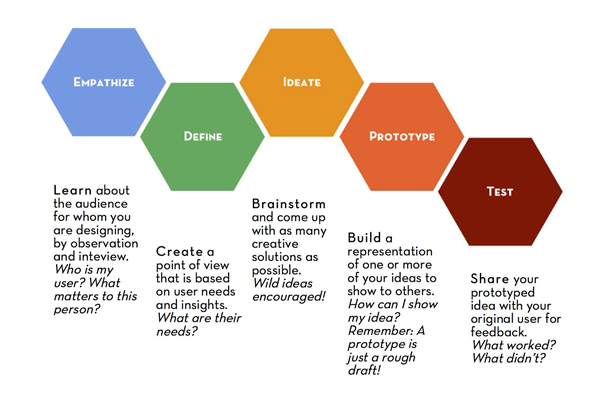
I used the Design Thinking Model of the Hasso Plattner Institute of Design at Stanford:
(Hasso Plattner Institute NYC, 18th July 2018)
Outlined above is a direct and linear Design Thinking process in which one stage seemingly leads to the next with a logical conclusion at testing. However, in practice, the process is carried out in a more flexible and non-linear fashion (Hasso Plattner Institute, NYC, 18th July 2018). This was very much the case as I went to explored possibilities during this process.
1.Empathize: Who is the user? Me. What do I want the product for: to bring some aspect of garden to the patio area. Requires easy to look after and low maintenance. Prefer not on the ground as I have a daughter in a wheelchair, which means another item to go around. What matters: to have a natural look and feel, so prefer no plastic. Item will have to require little maintenance. Preference of using wood and nature as much as possible.
Australian Curriculum Links: Identify how people design and produce familiar products, services and environments and consider sustainability to meet personal and local community needs (ACTDEK001)
Identify how people design and produce familiar products, services and environments and consider sustainability to meet personal and local community needs (ACTDEK001)
2. Define: Hanging pot plant that could be increased to be a hanging garden. Add colour texture to the patio area. Bring the garden closer to the house. Requires little to maintain.
3. Ideate: Pot: Re-purpose material such as empty drink bottles (milk/soft drink), cans, old tyres, plastic containers, spare wood from garden clean-up? Colour, texture, overall look, durability. What type of plant? Low maintenance requirement. Plant: size, type, foliage, colour, maintenance, texture? Essentially low maintenance as per end user desire. How to hang: type and size, colour, durability, use of screws, cord/string.
Sequence steps for making designed solutions and working collaboratively (ACTDEP009)
Design Mind Map – Designing the Prototype
Through the mind map, I was able to separate this design into three components of the one design, the base or pot, how to hang the pot plant and the plant itself.
Research: The Base/Pot
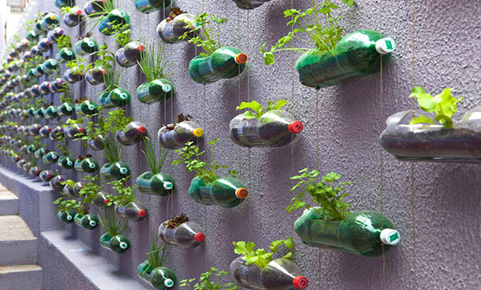
I found some wonderful ideas for using recycled plastic drink bottles to create a hanging garden. Plastic contamination is a terrible issue, where the oceans are flooded with plastic waste, harming our local wildlife, including birds, turtles, fish.
Plastic is a synthetic or man-made polymer. Plastics are divided into two distinct groups: thermoplastics and thermosets. The majority of plastics are thermoplastic, meaning that once the plastic is formed, it can be heated and reformed repeatedly (American’ Chemistry Council, 2019). Making the plastic recyclable. However, it is estimated that it takes 450 years for a soft drink container to degrade completely (Postconsumers, 2019).
(Skirmante, (N.D). Bored Panda).
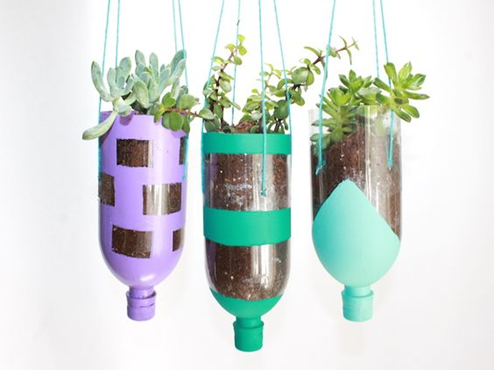
Another concept of a hanging garden using recycled water bottles using the bottles vertical instead of horizontal.
(Sanchez, K.L., 22nd April 2016)
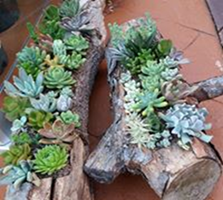
I had over the last couple of months been completing some major gardening in my back yard, including major pruning of a bottle brush tree. This left me with a piece of timber. It was then that I decided that I needed to use natural resources as much as possible. I wanted my hanging garden to look natural and to blend into the surroundings. The use of plastic bottles would not give the desired effect of the hanging pot plant, so have decided to use the wood, even though utilising the plastic would have made the item lighter and therefore easier to hang.
A horizontal design made from log
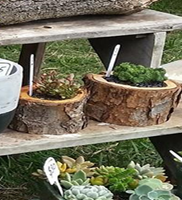
Wooden rounds cut off
(The Succulent Guy, 2019).
I used several different sized hole saw drill attachments to help me to drill into the wood and leave a nice round inner circle. I then used a chisel to remove the inside of the wooden round. This process would have been straightforward if I had a wood router. I then made a drill hole all the way through the base as a drain hole. However, the end result was not very even on the inside of the wooden round, which can not be seen after adding the dirt and plant. My woodwork ability is limited, and I was fortunate enough to have the assistance of my father for the woodworking equipment required and how to go about achieving my goal (safely).
Research: The Plant Itself
As I was going for a low maintenance idea, I started to research types of plants that required little upkeep. I decided on a succulent as most can live with bright light and occasional watering. I was fortunate enough that my next door neighbour had an ample supply of a succulent that she used as a ground cover. This succulent is a Coppertone, Sedum nussbaumerianum. I was able to take a piece which included a whole root system. Sedum nussbaumerianum is a low-growing ground cover that adds tons of textural interest with their shapes and hues (Desert Succulents, 2019). They also do well in hanging baskets and dish gardens (Desert Succulents, 2019). However, there are a wide variety of suitable succulents at Bunnings at reasonable prices.
Research: How to Hang the Potted Plant
I have to make sure that how I hang this potted plant can handle the weight and the elements of the sun, wind and rain. So I decided that by using a drill to assist with screwing in rust-resistant eyelet screws on each on the top of the base. Putting these screws on the side of the base would not have given the same results long term if the outside bark became lose overtime. I then will hang the plant with heavy jute string. Jute is a long, soft, shiny vegetable fibre that can be spun into coarse, strong threads (Worldatlas, 2019). It is produced primarily from plants, so still makes the item blend into the natural surroundings. I doubled the string to give extra strength.
My design
4. Prototype: Using all of the research and the requirements of the requirement of the audience (me)-
Pot/Base:wooden round with the centred drilled out (not all the way through) with one small hole drilled through the base as a drain hole.
How to Hang: metal eyelet screws and jute cord.
Plant: succulent a maintenance plant.
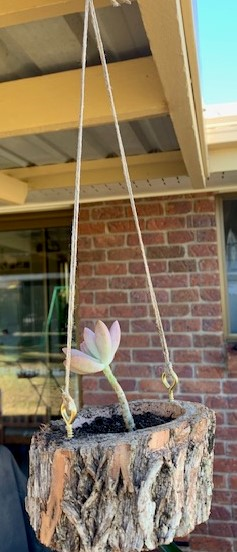
Below is a clip to show each step in the process. Overall, I am happy with the outcome.
5. Test: Does the design full the end user requirements? Yes. The hanging plant brings colour, texture and some aspect of the garden to the patio area. The cord/string is strong enough to hang the plant. The plant is not too heavy to be hung in the desired location. The item is low maintenance due to the design, the type of plant, screws and base used. Durability: the item will last for a while. It could be affected over time due to exposure to sunlight and other environmental elements (rain, wind, etc.). The string/cord might have to be replaced over time.
Australian Curriculum Links: Use personal preferences to evaluate the success of design ideas, processes and solutions including their care for the environment(ACTDEP008)
Finished product
How to Modify for the Classroom:
Due to the safety concerns of students using power tools and the process of preparing the wooden round to hold soil and a living plant this design would have to be modified to make it safe to be safely constructed in the classroom. Therefore, to make this design practical for a year 2 classroom, the use of timber cut from recycled pallets could be used. Having this timber cut to size to make into a square box. Students could use sandpaper for sanding back all the rough edges. Students would then be required (in small groups with the assistance of a teacher/aide/parent) to glue the pieces together (using wood glue) and then reinforce by hammering in nails. The Hammers and Mallets Safe Operating Procedures would be adhered to as attached link below (Department of Education- Organisational Safety and Wellbeing, July 2018).
The outside wood can be painted and decorated by the students. Students are required to plan their decoration on paper before beginning to paint their wooden boxes. Then an adult would drill holes so that the eyelet screws can be inserted by hand by students. Students can also experiment with plaiting/braiding/twisting/knotting in a pattern and adding different colours of macrame to the jute to add contrast and colour to their design. This design would make a wonderful Mother’s Day present.
Wooden boxes used from reclaimed wood. alivinwoodworking.com
My aim was to make a digital story about my daughter Jasmine. Jasmine has changed my world due to the challenges she faces everyday as a child with a disability. I have discovered that having a child that has several diagnosis and challenges in daily life has changed my perspective in this world. The aim of my digital story was for people to look past the diagnosis and the equipment they require to function, and focus on the person. Jasmine is not a Special Needs Child, but a Special child with needs. See the person not the disability.
I did find this challenge challenging, yet rewarding. I had over the years many photos of Jasmine. I was however had to ensure that no other person was visible in the photos I used (as I had not gained their permission). The focus was to focus on the person, so the type of shot used was close ups. The close up keeps only the face full in the frame. It is, without a doubt, the most important shot type to show dramatic elements, reactions, or emotion, which was my aim. I found the adding of text an issue, as the text was important to portray the message. Therefore using the white board with black text highlighted a point of difference. Using also handwriting gave a feeling of being raw. I use the soundtrack to also emphasise the message of the story. I used a lot of close up shots and pace to emotional engage the viewer into seeing a child, not the disability.
This challenge was very emotional for me, as the subject is very close to my heart. However I felt like it was time for me to open up for the benefit of my daughter and all others who have a disability.
This challenge is my opportunity for self-reflection, creativity and a way to share something about my art journey with others, in the following steps:
First up I will complete a River Reflection, identifying my various experiences.
I will then Identify key words and feelings.
Finally I will explore different ways to summarise my story in six words (YES it is a challenge!)
My River Reflection
My older brother was the one with natural artistic ability, which was highlighted when he was in Kindergarten. He drew a train, which his teacher painted and was hung in pride for many years in our family home.
Dance: I started ballet at the age of 4, which I continued for 8 years. I also took tap and jazz dance classes. I quit when seeing the girls a year above struggle with pointe shoes. I had a size 10 foot.
Singing: I sang in the school choir during primary school. I used to love to sing, but I considered myself not to be a good singer.
Music: Learnt to play the bass clarinet in year 5 which I continued into the first couple of years at high school.
Visual Arts: Through art, I discovered I could embrace my own style. There was no right or wrong. I enjoyed this freedom. I studied Art and Drama throughout High School.
Creativity: My creative skills were hidden but not forgotten after I left school. I always have had a flare with patterns. These skills once again surfaced when I started to design beaded jewellery and make quilts as a hobby. I am also creative in the kitchen and experiment with flavours and textures.
Self Portrait
My portrait: I started with a pencil drawing, which I tried to make realistic and it does show some resemblance to me. However, I have opted for a more traditional approach but used the image four times in different colours.
Self Portrait- Pencil Drawing
I then took this image and experimented with the size and colour.
I also tried my hand at a Picasso inspired self-portrait, where the nose and the mouth were to one side and the other facial features such as the eyes as if it was a face on the portrait. Picasso also used bold lines and simplicity in his portraits.
Self Portrait: Picasso Style
I also experimented with Andy Warhol’s style of the many identical prints using different vibrant colours similar to his Marilyn Monroe 1967 portfolio. Warhol used silkscreen to give an assembly line effect.
Self Portrait – Andy Warhol
MY book cover:
For this next part of my blog I will:
Think about colour theory and carefully consider the message I wish to convey.
Read up about fonts and typefaces – once again explore options and make informed choices.
Experiment with design layouts and impact.
Create my cover in an appropriate application
Evaluate the impact and success of your design.
I have opted for a more traditional approach but used the image four times in different colours. I have chosen four faces to represent the four different aspects of Art that have impacted my creativity. These being Dance, Drama, Music and Visual Arts. However, they also represent laneways. I have used primary colours are to represent the primary aspects of Art, and green (a secondary colour) to represent a blending of colours, as many Art disciplines are blended together. I have used an enlarged copy of the image to make the book cover more abstract, and have a focus on the eyes. I believe that the eyes are a window to the soul which is a common metaphor. It’s an expression for saying that the eyes of a person are supposed to give you insight into their inner world – their feelings, thoughts, etc. So the general idea is that if you look into a person’s eyes you get an idea of who they are.
6 words: Laneway is a play on my last name being Lane. I have used the black lines between the images to break up the writing to highlight the laneways. “The Art” is in a different font to the rest of the writing, representing the strong impact on the past that has lead to a changed more modern future. By reflecting on my art journey, I have discovered that my past has lead to my current creativity. The writing un-centered, however centring would lose the effect of the words through the use of the black lines.
My Book Cover
Through this challenge, I have reflected on my past, and how art in its many different forms have shaped me to be who I am today. This journey, therefore, represents the Art Laneway to My Creativity. I have completed a self-portrait that shows some resemblance, I have not attempted a self-portrait since high school. This aspect I found confronting, as I no longer draw. I have through this challenge experimented with size, colour, layout, design and different styles. Changes I would have made: not happy with how I have drawn my teeth, and the text is lost amongst the different coloured images in the Book Cover.